Putting your property on the market is more than just a transaction—it's an art of presentation, showcasing its best features, and inviting potential buyers to envision their future within its walls. To get your house market-ready, there's a crucial groundwork to cover.
In this guide, we'll outline five essential steps to transform your property into a market-ready gem. From decluttering to staging and everything in between, this checklist will provide a clear timeline to help you navigate this process.
5 Steps to Get Your House Market-Ready
Are you ready to make your home stand out and captivate potential buyers? Let’s dive in!
Step 1: Decluttering and Depersonalization
By decluttering and depersonalizing your home, you create an inviting atmosphere for potential buyers. Your goal is to allow them to visualize themselves living comfortably in the house.
Tasks:
- Remove Personal Items: Start by putting away personal photos and memorabilia. This will allow potential buyers to envision themselves living in the space rather than seeing it as someone else’s.
- Declutter Rooms and Storage Areas: Clean out unnecessary items, especially in high-traffic areas like the kitchen, living room, and bedrooms. Tidy up closets and storage areas to give the impression of ample storage space.
Timeline:
- Week 1: Begin the decluttering process by identifying areas that need work. Start with smaller spaces like countertops and gradually move towards larger areas, such as closets and rooms.
- Week 2: Complete decluttering and depersonalizing and aim to have all personal items removed, rooms decluttered, and unnecessary items donated, sold, or discarded.
Step 2: Repairs and Maintenance
It’s crucial to address repairs and ensure all systems within your home are functional. This proactive approach demonstrates to potential buyers that the property has been adequately cared for and maintained.
Tasks:
- Identify Necessary Repairs: Inspect your property and pinpoint any required repairs. Keep an eye out for leaky faucets, cracks or holes in walls, damaged flooring, or other visible wear.
- Make Repairs: Fix leaky faucets, cracks, or damaged areas. Patch up any visible cracks, fix leaky faucets or plumbing issues, and attend to any cosmetic damages that could deter potential buyers.
- Ensure All Systems are Functional: Test all the essential systems, including plumbing, electrical, and HVAC, to ensure they work properly. This includes plumbing fixtures, electrical outlets, heating, ventilation, and air conditioning systems.
Timeline:
- Week 3: Dedicate this week to a comprehensive assessment of the property. Create a detailed list of all repairs required, categorizing them by urgency and complexity.
- Week 4: Once you have the list, prioritize and schedule repairs. Aim to complete these repairs this week to ensure the property is in optimal condition for listing.
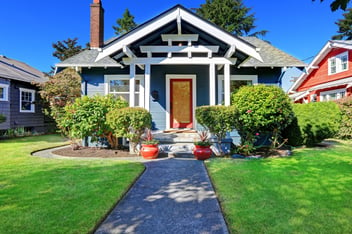
Step 3: Enhancing Curb Appeal:
Making improvements to the exterior of your property creates an inviting home that captivates potential buyers from the moment they arrive.
Tasks:
- Improve Landscaping: Trim bushes, mow the lawn, plant seasonal flowers, and add fresh mulch to flower beds. A well-groomed landscape instantly boosts a home’s visual appeal to buyers.
- Paint or Touch Up Exteriors: Check the outside of the home for any areas that need painting or touching up. Focus on the front door, window frames, and any areas with peeling paint or discoloration.
- Clean Pathways and Driveway: Pressure wash any pathways and the driveway to remove dirt, grime, and stains. This simple task can make a substantial difference in the overall cleanliness and appeal of the property.
Timeline:
- Week 5: Use this week to plan landscaping changes. Purchase necessary materials, schedule gardening or landscaping services if required, and begin executing the planned changes.
- Week 6: In the sixth week, focus on any required painting or touch-ups. Allocate time to clean the exterior surfaces and ensure pathways, driveway, and external walls are clean and well-presented.
Stage 4: Staging for Maximum Impact
Staging your property can work wonders! Following this timeline and implementing these staging techniques will maximize the property's appeal and create an emotional connection with prospective buyers.
Tasks:
- Rearrange Furniture for Better Flow: Evaluate your furniture arrangement and do your best to optimize the flow of each room. Consider spaciousness and functionality when positioning furniture to create inviting and easily navigable spaces.
- Use Neutral Decor: Replace bold or personalized decor with neutral tones and styles to appeal to a broader audience.
- Highlight the Property's Best Features: Emphasize the property's unique selling points. Whether it's a fireplace, large windows with a view, or architectural details, draw attention to these features through staging to captivate potential buyers.
Timeline:
- Week 7: Start staging by rearranging furniture and removing or replacing decor to create a neutral, inviting ambiance.
- Week 8: By the end of the eighth week, aim to have completed the staging process. Ensure each room showcases its best features and is photo-ready.
Stage 5: Professional Photography and Marketing
High-quality photography and strategic marketing play a pivotal role in attracting potential buyers. These steps can be challenging for first-time home sellers, so it’s always recommended to work with a knowledgeable real estate agent.
Tasks:
- Use Professional Photography: Professional photos significantly enhance the online presentation of your home, attracting more potential buyers. When you work with a real estate agent, they likely have connections with a trusted photographer.
- Create Marketing Materials: Crafting engaging and informative marketing materials includes a captivating description of the property, designing visually appealing flyers or brochures, and preparing virtual tours or videos to showcase the property's highlights. This step can be overwhelming for some sellers, and real estate agents can significantly help with it.
- Plan the Listing Strategy: Work with an experienced real estate agent and develop a strategic plan for listing the property. Determine the listing price, the timing for listing, and the platforms where the property will be marketed to reach the widest audience.
Timeline:
- Week 9: Arrange for a photographer to capture high-quality images of the property. Ensure the property is staged and prepared before the photography session to showcase its best features.
- Week 10: By the end of the tenth week, all marketing materials should be finalized. This includes descriptions, visuals, and any additional media. You should also work with your agent to solidify the listing strategy, including the timing and platforms for listing.
Partner with BlueWest Properties for Seamless Home Selling
At BlueWest Properties, we understand the significance of getting your house market-ready. Our dedicated team is here to guide you through every stage, ensuring your home is positioned for success. From decluttering to staging, from professional photography to strategic marketing, we're committed to maximizing your property's potential.
Contact BlueWest Properties today for a seamless and rewarding home selling experience. Let's work together to make your real estate dreams a reality!